Tuesday

Making Cinnamon Raisin Bread for Christmas Presents

This year, I thought I'd add a few goodies to the food baskets I give to friends at Christmas. Cinnamon Raisin Bread sounded good, so I went hunting for a recipe.

I fell for the title of the one at Genius Kitchen:

World's Best Cinnamon Raisin Bread

The site was unknown to me, but I figured it was popular because that recipe, alone, had hundreds of comments and ratings, mostly favourable.

Here is the link to the recipe but be warned: read my comments below before making it, or prepare to be confused.

Here is a photo of my loaves.

My first ever batch of Cinnamon Raisin Bread. Click to enlarge.
World's Best? Not really, but pretty good, especially the next day, when the flavours have had a chance to meld. Not too sweet, and it tastes fluffy though the loaf feels heavy when you lift it. You'd think it hadn't risen properly but it has.

The dough is of the enriched type, that is to say it contains butter and eggs.

Here are my notes

NOTES ON INGREDIENTS

1. Two packages of active dry yeast = 4-1/2 teaspoons

2. I used half golden raisins and half dark

2. 8 cups of AP flour - no indication of weight or how to measure. But since I know that 1 cup = 5 ounces, then I weighed 40 ounces (2 lbs, 8 ounces, or 1138 grams).

That was the perfect quantity when I mixed and kneaded the dough.

With such a huge amount of flour, it's important to know how to measure - do you dip directly into the bag, then level off? Do you scoop into your cup, then level off? To get 5 ounces per cup, the latter is the correct way. I did it the other way and got 50 ounces!

NOTES ON DIRECTIONS

1. Ignore the instructions -- use instant yeast and mix it and the salt with the flour. A hand whisk is the best tool for this.

2. If you have a stand mixer, iignore the directions and put everything in the stand mixer bowl - first with the flat beater - in this order: water, eggs, 1/2 cup sugar, milk, butter, raisins. Then flour with dough hook.

3. Finish kneading on the table. Be careful not to add too much flour.

4. Transfer to buttered bowl, leave to double in bulk.

5. Roll out to 24 inches long (left to right) and whatever width is needed to get about 1/2 inch of thickness.

6. Brush with milk, leaving one inch on both long sides.

7. Sprinkle cinnamon/sugar (1 cup) mixture - LEAVE 1 INCH ON BOTH LONG SIDES.

8. Roll up tightly. Start at bottom, very tight first turn. Watch this video for a way to use parchment paper to help in the rolling if you need it. 


9. Recipe says roll should be 3 inches diameter, and that works.

10. Pinch the seam really well to seal it.

11. Cut ends off (make buns), divide into 3, 8-inch sections, place in buttered pans with seam on bottom, tuck ends in very well for a more attractive finished loaf, and to keep filling from leaking out.

12. Brush tops with melted butter.

13. Leave to double in bulk.

OVEN at 350 degrees.

14. It's a good idea to place the pans on a cookie sheet in case the filling spills over the sides of the pans. This is more likely to happen if your pans aren't the very large ones recommended in the recipe.*

15. Bake until internal temperature reaches 200 degrees F, switching pans around after 20 minutes. The recipe says 45 minutes but my oven is very unreliable, so I always go by the temperature.

* If you don't have those biggies, cut a few slices off each end of the roll and bake them as buns - in buttered muffin tins - or not. In fact, the recipe will work very well for cinnamon buns - just add some brown sugar and butter at the bottom of the muffin or cake tin.


Sunday

Danish Rye Bread - An Update

I have baked many batches of Danish Rye Bread since this post.

With few exceptions, everything I wrote then still stands. This new post contains a few corrections, but it's mostly about a bread mix that I never thought I'd have to use... until I spent the summer in Montreal, leaving all my breadmaking ingredients behind, but not my desire for one of my favourite foods.

So it was with only a bit of skepticism -- after reading some good reviews of the product online -- that I put a box of Ikea's Brödmix Flerkorn in my shopping cart at the Saint Laurent store the other day.

At a mere $5 (Canadian!) for a large loaf (or two smaller ones, as I prefer to make), the bread is a steal.

Add to this the fact that you only need to add water -- the instructions suggest that you use the box itself for mixing, but I do not recommend this, at least not the first time.

When you pour the mix into a bowl, you can see how much settling and separation of the ingredients has taken place in the box.


I prefer to make two smaller loaves instead of a larger one because:
  1. It's a lot easier to get the loaf to cook right through the centre;
  2. It's easier to slice;
  3. I prefer the smaller size for my open-faced sandwiches.
Since I also didn't have my equipment with me, I just purchased some aluminium loaf pans at the dollar store.

This is the size that I used.

After baking, I washed them and used them over and over before putting them in the recycle bin.

It's easy to divide the mix if you have a kitchen scale, but you could also use a measuring cup.

Just follow the directions on the package for the resting time -- don't be disappointed if the dough doesn't rise, this step is strictly for rehydrating the grains and flours, not for creating air. As I indicated in my earlier post, you do not want this bread to have lots of air spaces. Look at Ikea's photo, that's what you want.

A Successful Experiment


On my most recent batch, since I was making two loaves, I thought I'd play around with one of them. I thought of adding nuts but I didn't have any. However, I had some golden raisins and some sugar, so to the second loaf I added (stirred into the dry mix, before adding the water):
  • 2 tablespoons of white sugar
  • 1/4 cup of golden raisins
Here are the results. The top slice is the regular recipe and the bottom one is the sweet(ish) one:


The reason the bottom slice is flat on top is that due to the sugar it did rise a bit, but then it fell back down after I poked it (see #3 below).

Honestly, they are both delicious and next time I will definitely try adding some walnuts to the "sweet" loaf.


Final Advice


This advice summary is based on all the batches of Danish Rye Bread that I have made since the beginning of the year. I hope it helps!
  1. Use a thermometer to check the inner temperature of the loaf - around 200-205 F (96 C) or you may end up with a gooey mess.
  2. Make sure your oven temperature is as exact as possible - you especially don't want it to be too hot. 
  3. To avoid large air spaces, some experts recommend poking loaf all over with a skewer or chopstick before baking. I did that to my "sweet" loaf this time.
  4. Large air spaces are undesirable because they make the bread too crumbly to slice.
  5. This is what you do to avoid a hard crust -- trust me, a crunchy crust is not a plus for this kind of bread: once your loaf has cooled slightly, wrap it tightly with plastic wrap. This will redistribute the moisture, ensuring the right kind of crust. Let the loaf cool at room temperature, then refrigerate, still in its plastic wrap.
  6. This bread tastes better the next day, and even the day after - so even though it's hard to resist having a taste while still warm, you won't know how good it really is unless you leave it to do its thing for a while.
  7. Speaking of refrigeration, this bread keeps for weeks in the refrigerator. Keep it well wrapped in plastic to prevent drying out.
  8. Even though I show a knife with teeth in my first post, I now know that it's better to use a very sharp knife with a plain blade for getting a nice slice, and as thin as you want.
  9. Another of my tricks is to flip the loaf upside-down for slicing. The bottom crust is always softer and thinner, easier to pierce.
  10. Forget about toasting it.
  11. In case you're not sure about all the different ways to enjoy your new favourite bread, just google "smorrebrod recipes"!
Velbekomme! (Bon appétit! in Danish.)

NOTE: AS OF TODAY, DECEMBER 15, 2022 (my 81st birthday!), I am unable to find that bread on the Canadian Ikea website. Perhaps it's only available in stores now? 


Saturday

Can You Make Danish Rye Bread in The Maritimes?


DECEMBER 2022: PLEASE REFER TO THE NEW RECIPE, HERE.

Among the many “exotic” foods that you can’t find in my present coin de pays is the kind of dense, dark and strong German or Danish rye or pumpernickel bread that I really like as a vehicle for smoked salmon and many other delicacies.

So I went online, hunting for recipes. Most of them required a sourdough starter, so I mixed one up and crossed my fingers that the gods of wild yeast would feel magnanimous.

So far I have tried two recipes; one of them requires a sourdough starter, and the other uses yeast, beer and buttermilk instead.

Regarding the latter, even if the blog owner's attitude had been less arrogant when I asked her a question, I found it so much more expensive to use beer and buttermilk instead of sourdough, that even though the bread was acceptable (though too bitter for my taste), I have decided I won't make it again.

The recipe that I describe in this post uses sourdough; it's from Nordicfoodliving.com. Their article includes a short video.

I started out by following their own starter recipe (there's a link in their Ingredients List). While this was brewing, I went looking for a local supplier for all the different grains and I found a local stone mill that works strictly with organic grains. Yay!

I put the soaker ingredients together on Thursday, and baked the bread yesterday. Then I let it mature overnight.

In other words, this is a three-day recipe, so plan ahead.

Recipe Notes


1. The first problem I had with this recipe is that the ingredients are in cup and deciliter measures, that is to say, by volume instead of by weight. I noticed other readers complained about this, so I hope that someday the blog author will add the weights.

For now, I did the conversion myself, but as everyone knows, when it comes to flours especially, the method of filling the cup can make a huge difference in the final weight. I used the one where you spoon the flour into the cup, which results in a smaller amount, but next time maybe I will use the other technique - the one where you use your measuring cup to dip into the flour directly. 

For the purposes of this article, I did an experiment with whole wheat flour. First I scooped the flour into my measuring cup with a spoon, then I evened out the top and weighed the flour.

Then I took the same measuring cup and dipped it into the bag of flour, evening out the top as before. This latter method is called "dip and sweep".

The difference was a whopping 19.6%! 127 grams (4.4 ounces) vs 152 grams (5.3 ounces). 

For a complete description of this phenomenon, see this Serious Eats article. Because flours also vary in fluffiness, the difference can attain 50%, according to the article.

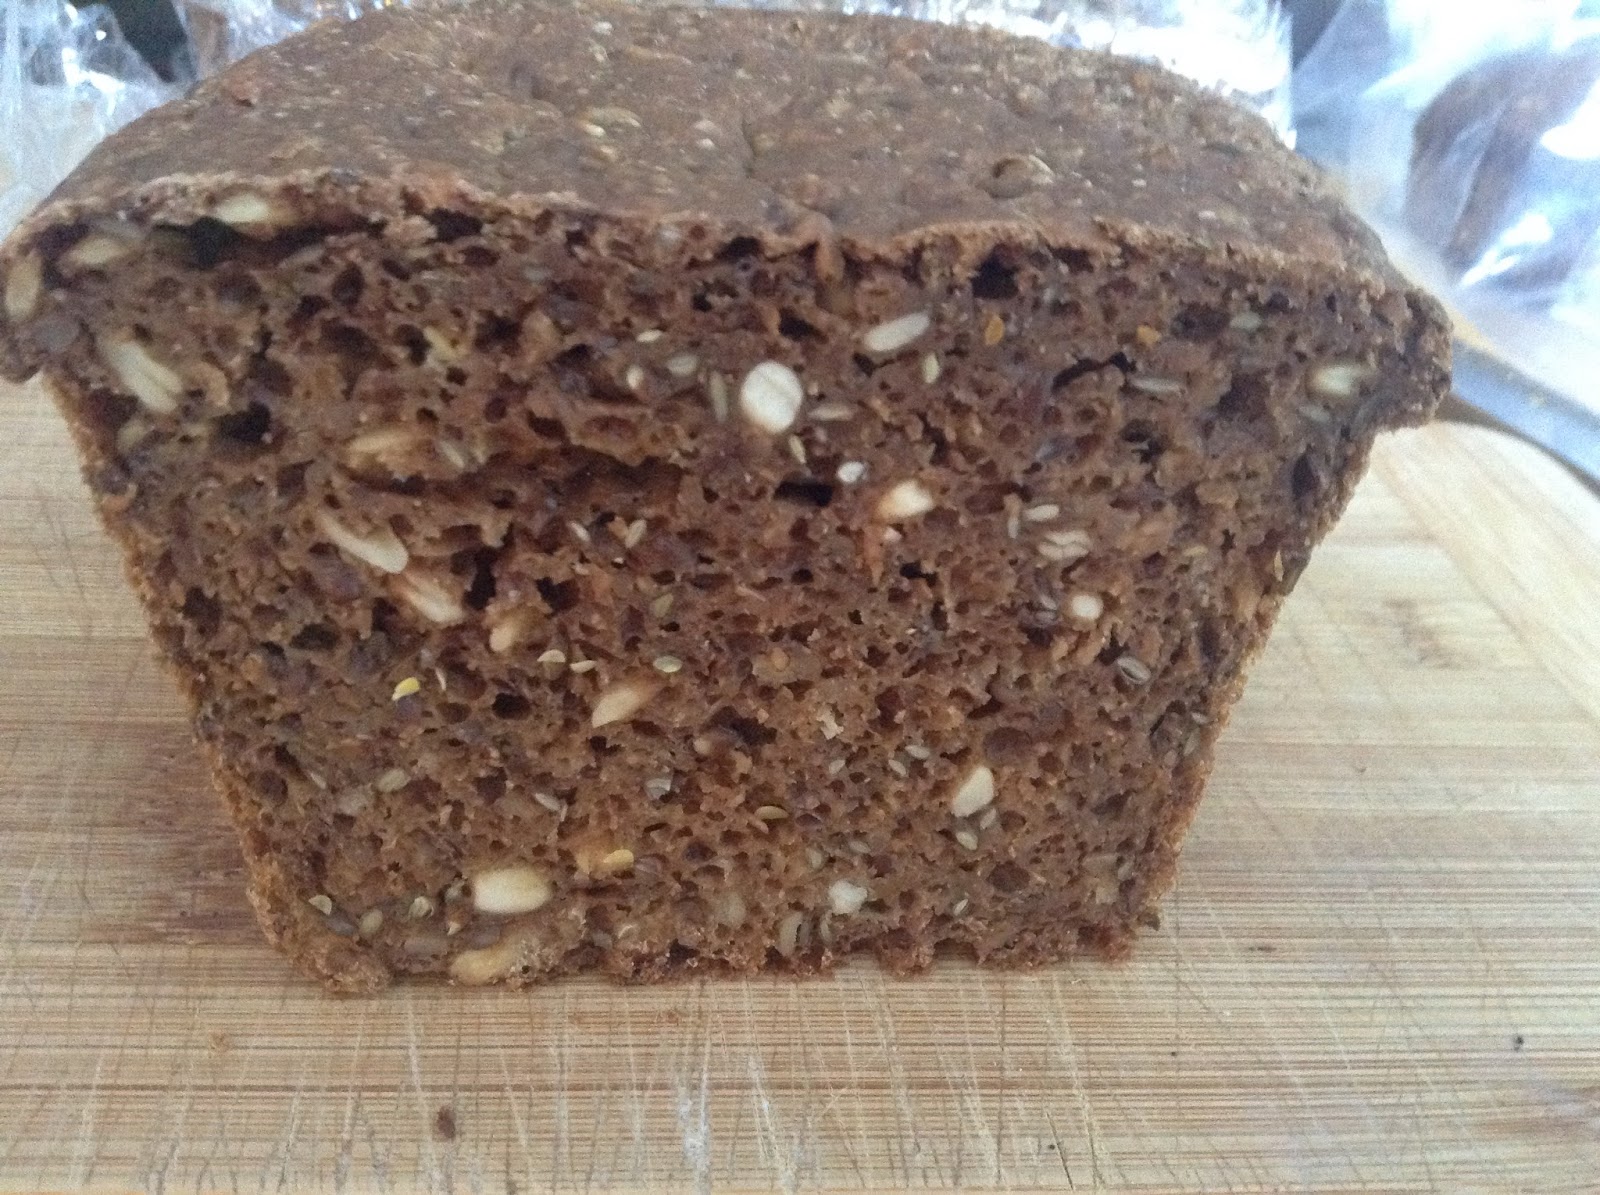
They recommend "dip and sweep", by the way. I'm not sure I would agree when it comes to cakes and pastries, but it sounds reasonable for bread, and I'm thinking that this may account for my dough being runnier than in the video, and also for the finished loaf having more holes than the example. I do believe this bread should be really dense.

I will certainly try "dip and sweep" next time.

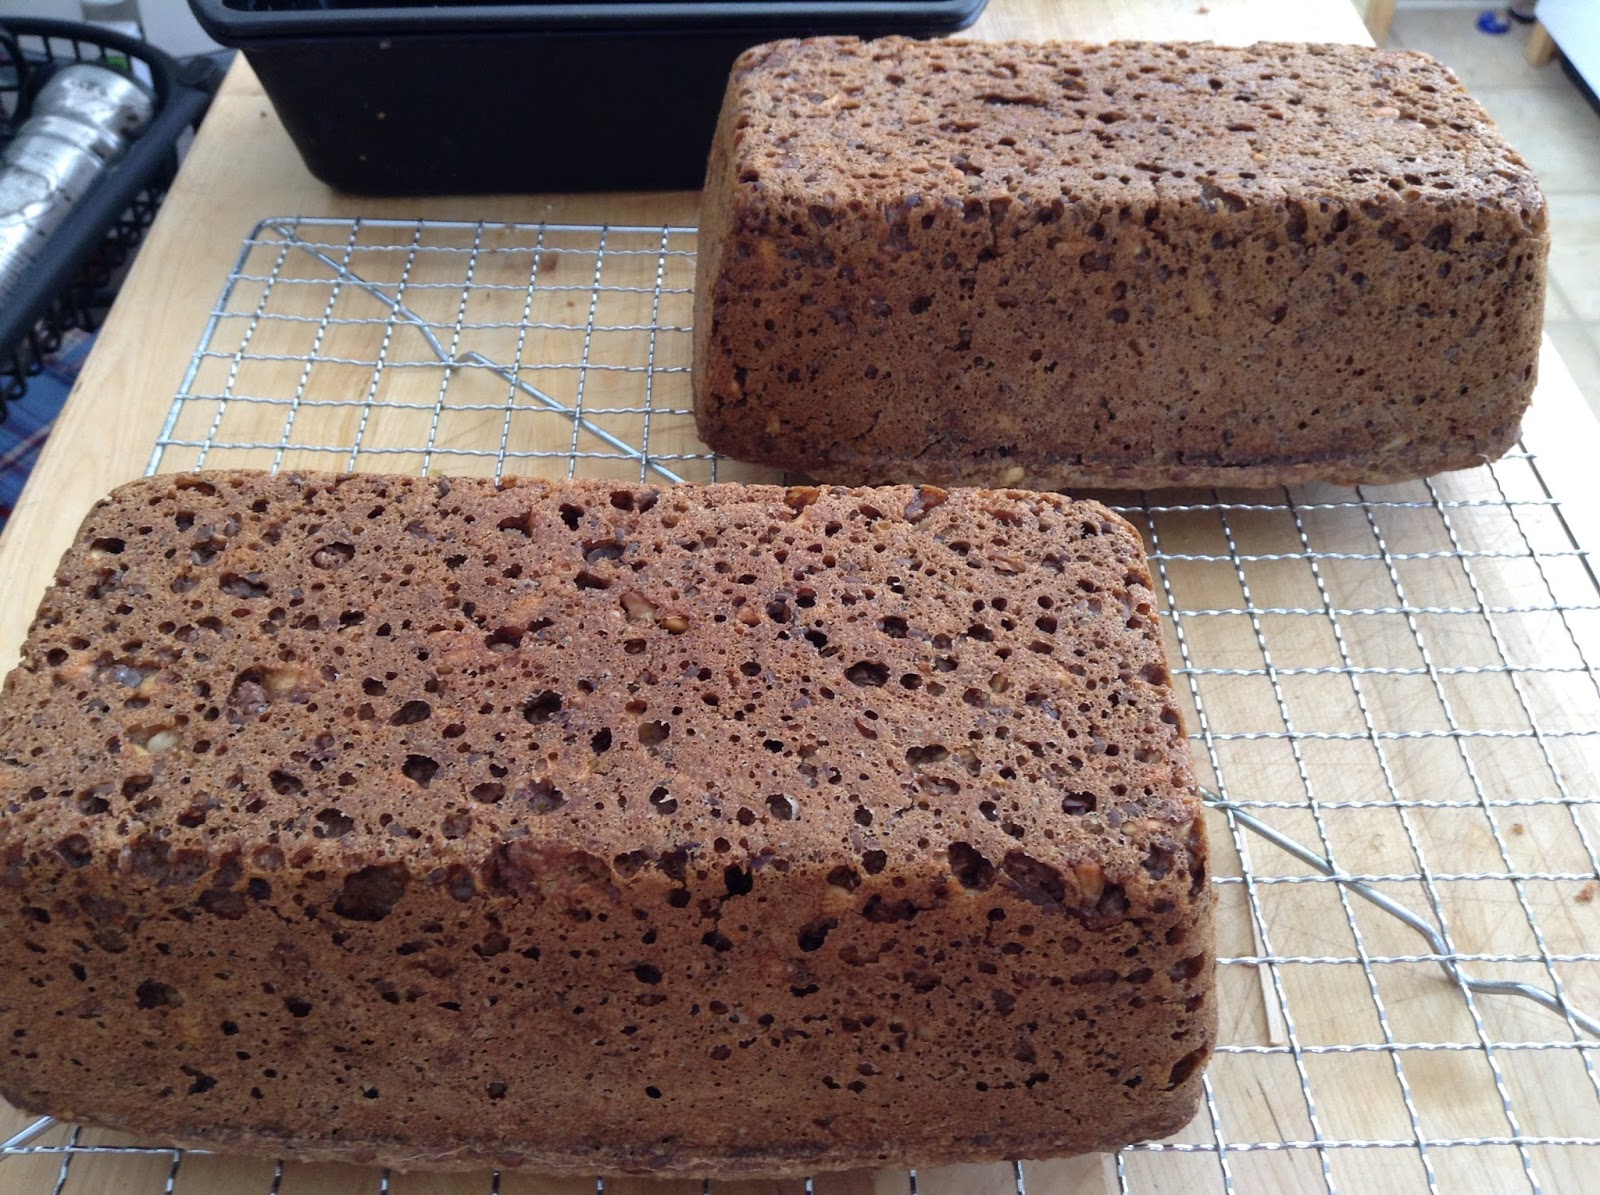
Loaves cooling upside-down

2. The second problem I had was that I am used to figuring out if my bread is cooked through by taking the internal temperature with my small instant thermometer. I asked the recipe's author but he said he just knows when his bread is ready. Which is fine when it's your recipe and you've done it countless times, but for a beginner? No, so I went searching for other recipes and yes, most of them do mention the temperature they look for. 205 F (96 C) seemed to be the average so that's what I used for this batch.

At that temperature, my loaves were cooked but still sticky. See what happens to the knife after just one cut, a whole day after baking.

Bread knife after only one cut...


And you absolutely have to wash it off, or the next slice will be a mess!

So, definitely, the next time I make this bread I will either cut down on the liquid or increase the amount of flour by measuring it differently.

There is another method that I've seen recommended for allowing the steam to escape: just before baking, you poke holes all over the dough with a tool like a large bamboo skewer. I'll try that too, next time.

Another way I've found to get those dense loaves to dry out better in the centre, is to make smaller loaves. So next time, I will make three loaves with the same amount of dough. 

And I will pull each one out of the oven at different temperatures: 205 F, 210 F, and 215 F 96, 99 and 101 C).

3. The third problem I had is a very minor one: my bread is too dark -- I find it unnaturally dark. It's darker than the sample in the video. The recipe does say that the gravy browning (caramel colouring) is optional, and I don't think the author used it in the one he photographed. I won't use it next time. Cocoa is often used for the same purpose, and I may just try that in a future batch. Or not. Those breads are very dark by tradition more than necessity, I think. To me, the darkness covers the individual grains, and I like to see them in my grain breads.

4. The original recipe calls for baking for 1 hour, but to attain the temperature I wanted I had to bake them for an extra half hour (an hour and a half total). My oven is reliable, I have a thermometer inside of it, and it's a normal oven without convection. After an hour, the internal temperature was a mere 185 degrees F (85 C) and a toothpick inserted came out covered with raw dough.

5. Finally, the order in which the ingredients are put together needs to be changed. It's very hard to incorporate salt into a thick dough. It should be added to the flours. Similarly, why add liquids like malt syrup and gravy browning to the thick dough instead of the soaker, the day before?

The instructions would then read as follows:

DAY ONE

Take one cup (250 grams) of sourdough starter from jar in fridge, and add ½ cup of water, ¼ cup of rye flour and ¼ cup of white flour to it. This will add up to exactly the quantity required in the recipe. Mix well and leave out overnight.

DAY TWO

1. In a large bowl, make a soaker by combining:

  • whole rye kernels, if using (I plan to add some at my next trial)
  • cracked rye kernels
  • cracked wheat
  • flax seeds
  • sunflower seeds
  • water
  • sourdough
  • gravy browning (if using); and
  • malt or dark syrup
2. Mix well, cover and leave to soak for a minimum of 8 hours. This can be done in the evening, so that you can continue the morning after.


DAY THREE

1. In a separate bowl, combine the all-purpose flour, the rye flour, (the cocoa, if using), and the salt together. Stir well with a wisk.

2. Stir the soaker well, and stir in the dry ingredients. Mix until totally combined.

3. Cover and let rise for 2 hours. (I place mine in the oven with the light on, which results in a temperature of 80 degrees F - 27 C)

4. Butter bread pans and divide the dough equally between them. Do not fill the pans too much; you don't want the loaves to have a dome once they are baked (as mine did).

5. Let the loaves rise in their pans for 1 to 2 hours. Don't allow them to rise too much.

6. Bake at 350 F (180 C) for half an hour, then turn the pans around and bake another half hour. Then measure the temperature in the center of the loaves. It should be at least 205 degrees F (96 C). Leave another 15 minutes and take temperature again. Turn the loaves around again if they're not browning evenly around the edges. Keep checking the temperature. My total baking time was an hour and a half.

7. When done, remove the breads from the pans and let them cool to lukewarm, on a rack. At that point it's a good idea to wrap them in plastic if you want to keep the crust soft.

Nutrition Information


I'll leave it up to you to find the complete nutrition information for all that good stuff. What I'm mostly interested in are the calories because I track all my food as a way of keeping my weight stable.

It's easy to calculate the calories in any recipe by looking up the number of calories in each ingredient, adding those up, and dividing by the total weight of the finished product.

The total weight of the finished loaves was 68 ounces (2,060 grams), and the total number of calories was 3,800, so 3,800 by 68 = 56 calories per ounce, or 3,800 by 2,060 = 1.8 calories per gram.

This is interesting, because plain white bread (like baguette) weighs in at 70 calories per ounce, and the whole grain bread that I make at home, 75 calories per ounce.

This morning, a thin slice of this bread -- that kind of bread is always sliced thin -- weighed 1.5 ounces (42.5 grams), i.e., 84 calories.

Conclusion


The taste is fine, and I expect it to improve over the next few days, as is usual with those complex breads.

The texture of this particular bread is lighter, less dense than I like, however, and this could affect its ability to keep without going bad -- even refrigerated. The loose texture could be due to the excess liquid described above, and this can only be determined with further testing. Before I do that, I will try other recipes. Stay tuned!

And, to answer the question: Yes, you can make real Danish Rye Bread here!

Postscript

It's been a week and I'm happy to report that the stickiness problem seems to have resolved itself -- i.e., the bread has dried to just the right degree of moistness, so now I'm not so sure if the planned adjustments are all going to be necessary... 

And as for the flavour, oh my, it's still the best bread of its type I have ever made!


Wednesday

DIY Hamburger Buns

Whenever I make a batch of multigrain bread, I set aside a small amount of dough for hamburger buns.

Once the dough has fermented in the fridge for about two days, I weigh it and take out whatever I want to turn into buns. I divide the rest in two.

I make the 2-oz portions into balls, then cover and rest 30 minutes. Then I flatten them with a rolling pin, to about 4 inches in diameter.


Because of the extra deflating, they are not ready to bake until the main loaves have been taken out, so that works out quite well.

They don't rise a lot before baking, but that's okay because they literally puff up in the oven, leaving a nice air pocket inside for the components of your burger, be it carnivore or not. 

This also means that your buns are not so full of calories. At 75 calories per ounce, mine average under 150 calories each.

You could also use them as mini pitas while they're still hot.


I use the same hot stone and steam method as my freestanding loaves to bake them, at around 450 degrees F.

To keep them soft, throw them in a plastic bag as soon as they're cool.

This works with any bread dough that I have ever used.


Monday

Blog Revived!

Good news!

Google has finally made it possible to re-publish this blog, though under a slightly different name.

It is now called: the-cooks-corner-blog.blogspot.ca

If you are receiving this, would you mind putting a few words in the Comments section to that effect?

Thank you, and hoping to see you all again very soon with some new, exciting content.

Gina